Microsoft - AZ-800: Administering Windows Server Hybrid Core Infrastructure
Sample Questions
Question: 330
Measured Skill: Manage virtual machines and containers (15-20%)
Your network contains an Active Directory Domain Services (AD DS) domain named contoso.com. The domain contains two servers named Server1 and Server2 that run Windows Server. The domain contains two users named User1 and User2.
You perform the following tasks:
- Enable Remote SSH Access on Server2.
- Sign in to Server1 as User1.
You need to establish an SSH session from Server1 to Server2 and sign in as User2.
Which command should you run?| A | sshd Contoso\User2@Server2 |
| B | ssh Contoso\User2@Server2 |
| C | ssh Server2 Contoso\User2 |
| D | sshd Server2 Contoso\User2 |
Correct answer: BExplanation:
On Windows Server with OpenSSH, you use the SSH client command ssh, not sshd, which is the server/daemon process.
When signing in with an Active Directory domain account, the correct username format is:
Domain\User@Host
OpenSSH for Windows
OpenSSH is the open-source version of the Secure Shell (SSH) tools used by administrators of Linux and other non-Windows for cross-platform management of remote systems. Beginning with Windows 10 build 1809 and Windows Server 2019, OpenSSH is available as a feature on demand.
SSH is based on a client-server architecture where the system the user is working on is the client and the remote system being managed is the server. OpenSSH includes a range of components and tools designed to provide a secure and straightforward approach to remote system administration.
References:
OpenSSH for Windows overview
Get started with OpenSSH for Windows
Question: 331
Measured Skill: Manage storage and file services (15-20%)
You have a server that runs Windows Server and contains 10 physical disks.
You plan to implement storage spaces that will use the disks.
You are evaluating whether to configure the following options:
- A two-way mirror
- A parity storage layout
What is the maximum number of disks that can fail without data loss for each option?
(To answer, select the appropriate options in the answer area. NOTE: Each correct selection is worth one point.)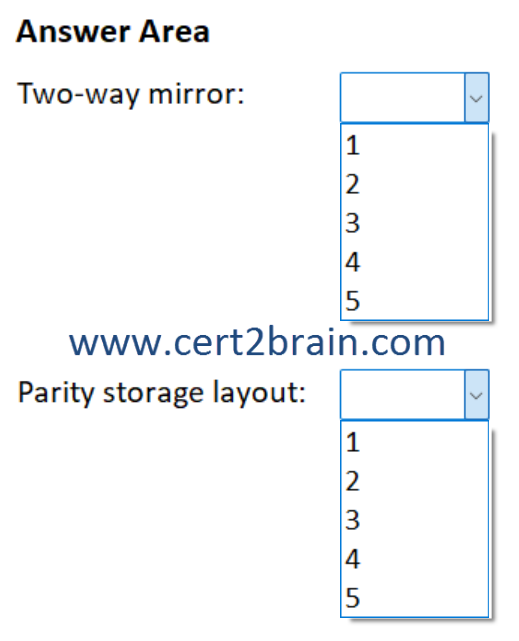
| A | Two-way mirror: 1
Parity storage layout: 3 |
| B | Two-way mirror: 2
Parity storage layout: 4 |
| C | Two-way mirror: 3
Parity storage layout: 2 |
| D | Two-way mirror: 4
Parity storage layout: 4 |
| E | Two-way mirror: 5
Parity storage layout: 1 |
| F | Two-way mirror: 5
Parity storage layout: 5 |
Correct answer: EExplanation:
Storage Spaces (not to be confused with storage spaces direct (S2D)) in Windows Server is a robust storage virtualization technology that enables you to efficiently manage, protect, and scale your storage infrastructure. It allows you to aggregate multiple physical drives into a single logical storage pool, from which you can create virtual disks known as Storage Spaces. These virtual disks can be provisioned with various resiliency options, providing redundancy, fault tolerance, and flexibility to meet diverse storage requirements. It's conceptually similar to redundant array of independent disks (RAID)
Mirror spaces
Mirror spaces provide redundancy by duplicating data across two or three copies, known as two-way or three-way mirroring. This configuration ensures data availability and protection against drive failures. If one drive fails, data remains accessible from the mirrored copies on other drives. Mirror spaces offer excellent read and write performance, making them suitable for performance-sensitive workloads and critical data storage.
Here are some key characteristics of mirror spaces:
- Data is duplicated across two or more drives for redundancy.
- Two-way mirroring tolerates one drive failure; three-way mirroring tolerates two simultaneous drive failures.
- Excellent read and write performance.
- Higher storage overhead due to data duplication (50% overhead for two-way mirroring, approximately 66% overhead for three-way mirroring).
- Ideal for mission-critical workloads, databases, and virtual machine storage.
Two-way mirror stores two copies of the data. As long as one copy of each data block survives, the virtual disk remains intact. With 10 disks, the theoretical maximum is 5 failed disks (assuming no mirrored pair loses both copies).
Parity spaces
Parity spaces provide fault tolerance by distributing parity information across multiple drives. This parity information allows Storage Spaces to reconstruct data if a single drive fails (single parity) or two drives fail (dual parity). Parity spaces offer more efficient storage utilization compared to mirror spaces, but they have lower write performance due to the overhead of calculating and writing parity data. Parity spaces are well-suited for archival storage, backup repositories, and workloads with predominantly sequential read operations.
Here are some key characteristics of parity spaces:
- Data is striped across multiple drives with parity information for fault tolerance.
- Parity information allows data reconstruction if a drive fails.
- More efficient storage utilization compared to mirror spaces.
- Lower write performance due to parity calculations.
- Good read performance, especially for sequential workloads.
- Ideal for archival storage, backups, and workloads with lower write performance requirements.
Parity storage spaces provide single-parity protection, similar to RAID 5. Single parity can recover from only one disk failure, regardless of whether you use 3 disks or 10 disks. A second disk failure causes data loss. Therefore, only 1 disk can fail without data loss.
References:
Storage Spaces overview in Windows Server
Deploy Storage Spaces on a stand-alone server
Question: 332
Measured Skill: Manage virtual machines and containers (15-20%)
You have an Azure subscription. The subscription contains multiple virtual machines that run
Windows Server.
You need to create an Azure Machine Configuration package.
Which three actions should you perform in sequence?
(To answer, move the appropriate actions from the list of actions to the answer area and arrange them in the correct order.)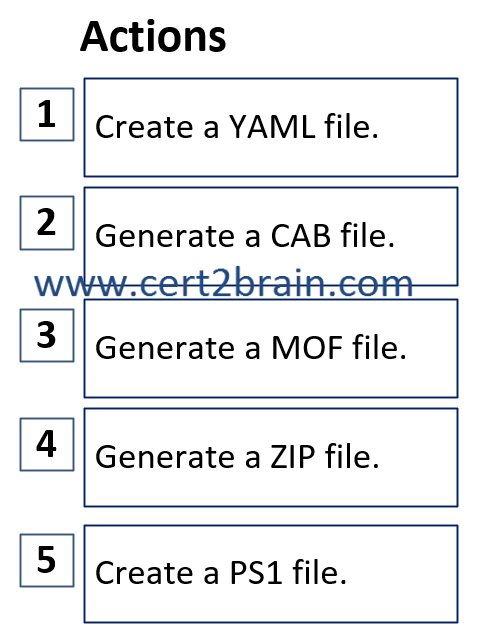
| A | Sequence: 1, 3, 2 |
| B | Sequence: 5, 2, 3 |
| C | Sequence: 5, 3, 4 |
| D | Sequence: 1, 3, 4 |
Correct answer: CExplanation:
Machine configuration uses PowerShell Desired State Configuration (PSDSC) when auditing and configuring both Windows and Linux. The DSC configuration defines the condition that the machine should be in.
To create an Azure Machine Configuration (Guest Configuration) package for Windows Server VMs, the correct workflow is based on how Machine Configuration is built on PowerShell DSC.
1. Create a PS1 file
- You start by authoring a PowerShell DSC configuration in a
.ps1 file.
- This defines the desired state you want to audit or enforce on the VM.
2. Generate a MOF file
- The DSC configuration (
.ps1) is compiled to produce a MOF file, which contains the actual configuration instructions consumed by Machine Configuration.
3. Generate a ZIP file
- The MOF file (and supporting files) are packaged into a ZIP file, which becomes the Machine Configuration package uploaded and referenced by Azure Policy.
Reference: How to create custom machine configuration package artifacts
Question: 333
Measured Skill: Manage Windows Servers and workloads in a hybrid environment (10-15%)
You have an Azure subscription. The subscription contains a virtual machine named VM1 that runs Windows Server.
You plan to automate tasks on VM1 by using a runbook.
You need to recommend which languages can be used to develop the tasks in the runbook and the minimum interval that can be used when scheduling the tasks.
What should recommend?
(To answer, select the appropriate options in the answer area. NOTE: Each correct selection is worth one point.)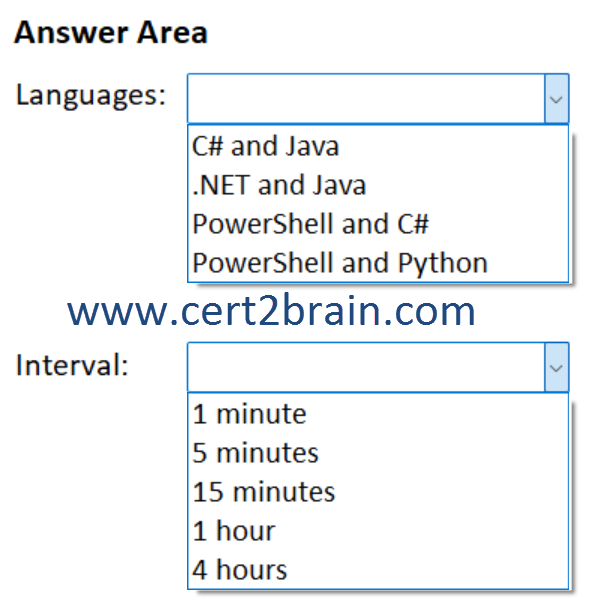
| A | Languages: C# and Java
Interval: 5 minutes |
| B | Languages: .NET and Java
Interval: 1 minute |
| C | Languages: PowerShell and C#
Interval: 4 hours |
| D | Languages: PowerShell and C#
Interval: 5 minutes |
| E | Languages: PowerShell and Python
Interval: 15 minutes |
| F | Languages: PowerShell and Python
Interval: 1 hour |
Correct answer: FExplanation:
The Azure Automation Process Automation feature supports several types of runbooks, as defined in the following table.
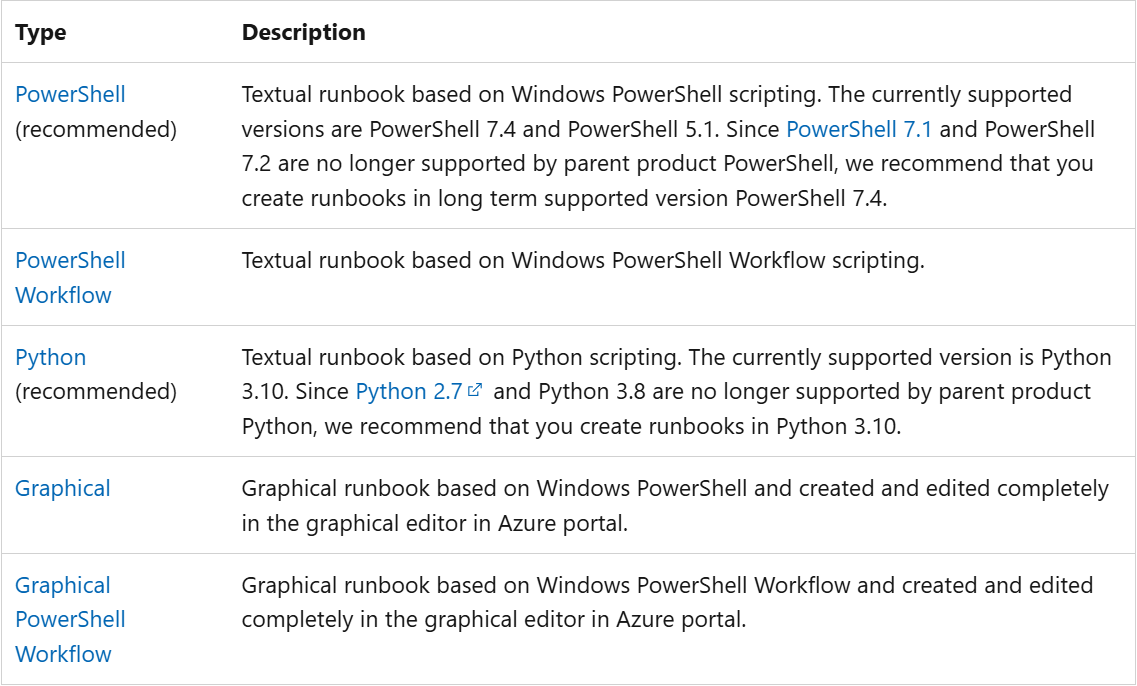
For Azure Automation runbooks, the most granular built-in schedule recurrence is hourly. When you link a runbook to a schedule in Azure Automation, you can choose one-time or recurring schedules such as hourly, daily, weekly, or monthly, but minute-based recurrence isn’t supported natively.
References:
Azure Automation runbook types
Manage schedules in Azure Automation
Question: 334
Measured Skill: Manage virtual machines and containers (15-20%)
You have a Docker host.
You need to create a Windows Server container image that will include an installation of Python.
How should you complete the Dockerfile?
(To answer, select the appropriate options in the answer area. NOTE: Each correct selection is worth one point.)
| A | # check=` FROM mcr.microsoft.com/windows/servercore:ltsc2025
RUN powershell.exe -Command wget https://www.python.org/ftp/python/3.10.16/python-3.10.16.exe; \
Start-Process c:\python-3.10.16.exe -ArgumentList '/quiet InstallAllUsers=1 PrependPath=1' -Wait; ` |
| B | # check=` FROM mcr.microsoft.com/windows/servercore:ltsc2025
RUN powershell.exe -Command wget https://www.python.org/ftp/python/3.10.16/python-3.10.16.exe; /
Start-Process c:\python-3.10.16.exe -ArgumentList '/quiet InstallAllUsers=1 PrependPath=1' -Wait; ` |
| C | # escape=` FROM mcr.microsoft.com/windows/servercore:ltsc2025
RUN powershell.exe -Command wget https://www.python.org/ftp/python/3.10.16/python-3.10.16.exe; `
Start-Process c:\python-3.10.16.exe -ArgumentList '/quiet InstallAllUsers=1 PrependPath=1' -Wait; ` |
| D | # escape=` FROM mcr.microsoft.com/windows/servercore:ltsc2025
RUN powershell.exe -Command wget https://www.python.org/ftp/python/3.10.16/python-3.10.16.exe; \
Start-Process c:\python-3.10.16.exe -ArgumentList '/quiet InstallAllUsers=1 PrependPath=1' -Wait; ` |
| E | # syntax=` FROM mcr.microsoft.com/windows/servercore:ltsc2025
RUN powershell.exe -Command wget https://www.python.org/ftp/python/3.10.16/python-3.10.16.exe; `
Start-Process c:\python-3.10.16.exe -ArgumentList '/quiet InstallAllUsers=1 PrependPath=1' -Wait; ` |
| F | # syntax=` FROM mcr.microsoft.com/windows/servercore:ltsc2025
RUN powershell.exe -Command wget https://www.python.org/ftp/python/3.10.16/python-3.10.16.exe; /
Start-Process c:\python-3.10.16.exe -ArgumentList '/quiet InstallAllUsers=1 PrependPath=1' -Wait; ` |
Correct answer: CExplanation:
In many cases a Dockerfile instruction will need to span multiple lines. To do this, you can use an escape character. The default Dockerfile escape character is a backslash \. However, because the backslash is also a file path separator in Windows, using it to span multiple lines can cause problems. To get around this, you can use a parser directive to change the default escape character.
To modify the escape character, place an escape parser directive on the very first line of the Dockerfile. This can be seen in the following example.
# escape=`


FROM mcr.microsoft.com/windows/servercore:ltsc2019


RUN powershell.exe -Command `

    $ErrorActionPreference = 'Stop'; `

    wget https://www.python.org/ftp/python/3.5.1/python-3.5.1.exe -OutFile c:\python-3.5.1.exe ; `

    Start-Process c:\python-3.5.1.exe -ArgumentList '/quiet InstallAllUsers=1 PrependPath=1' -Wait ; `

    Remove-Item c:\python-3.5.1.exe -Force
Only two values can be used as escape characters: \ and `.
Reference: Dockerfile on Windows