Microsoft - MS-102: Microsoft 365 Administrator
Sample Questions
Question: 503
Measured Skill: Deploy and manage a Microsoft 365 tenant (25–30%)
You have a Microsoft 365 E5 subscription that contains a Windows 11 device named Device1 and a user named User1.
User1 works at a branch office and reports slow connections to Microsoft 365 services.
You need to ensure that User1 can test the connections by running the Microsoft 365 network connectivity test tool on Device1. The solution must follow the principle of least privilege.
To which group should you add User1 for Device1?| A | Power Users |
| B | Network Configuration Operators |
| C | Users |
| D | Administrators |
Correct answer: CExplanation:
There are two parts to the Microsoft 365 network connectivity test: the web site https://connectivity.m365.cloud.microsoft and a downloadable Windows client application that runs advanced network connectivity tests. Most of the tests require the application to be run, which populates results back into the web page as it runs.
You'll be prompted to download the advanced client test application from the web site after the web browser tests have completed. Open and run the file when prompted.
Once the client application starts, the web page updates to show this result. Test data starts to be received to the web page. The page updates each time new-data is received and you can review the data as it arrives.
When the tests are completed, the web page and the advanced tests client will both show that. If the user is signed in, the test report is uploaded to the customer's tenant.
The advanced test client requires .NET 6.0 Runtime. If you run the advanced test client without that installed you'll be directed to the .NET 6.0 installer page. Administrator permissions on the machine are required to install .NET 6.0 Runtime.
To run the Microsoft 365 network connectivity test tool, a user only needs the ability to execute a normal desktop application and to perform outbound network connectivity tests. These actions do NOT require elevated privileges.
Reference: Microsoft 365 network connectivity test tool
Question: 504
Measured Skill: Deploy and manage a Microsoft 365 tenant (25–30%)
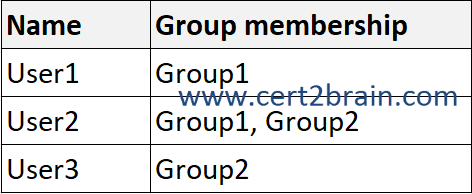
You have a Microsoft 365 subscription that contains two groups named Group1 and Group2. The
subscription contains the users shown in the following table.
The users are directly assigned licenses as shown in the following table.
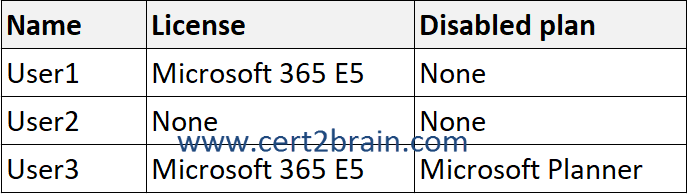
The groups are assigned licenses as shown in the following table.

For each of the following statements, select Yes if the statement is true. Otherwise, select No.
(NOTE: Each correct selection is worth one point.)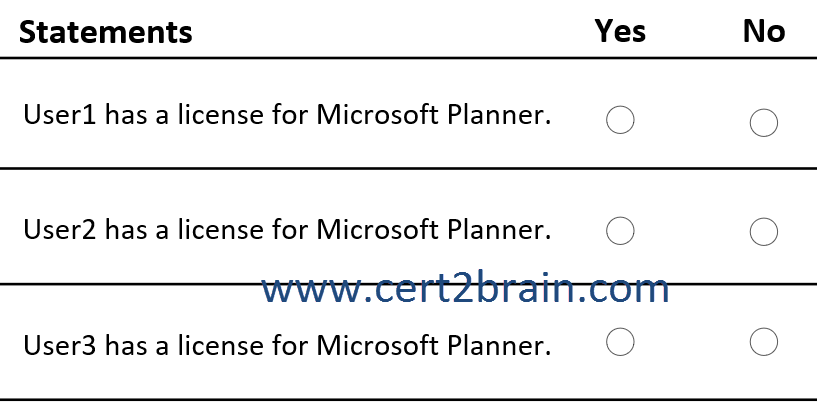
| A | User1 has a license for Microsoft Planner: Yes
User2 has a license for Microsoft Planner: Yes
User3 has a license for Microsoft Planner: Yes |
| B | User1 has a license for Microsoft Planner: Yes
User2 has a license for Microsoft Planner: Yes
User3 has a license for Microsoft Planner: No |
| C | User1 has a license for Microsoft Planner: Yes
User2 has a license for Microsoft Planner: No
User3 has a license for Microsoft Planner: Yes |
| D | User1 has a license for Microsoft Planner: No
User2 has a license for Microsoft Planner: Yes
User3 has a license for Microsoft Planner: Yes |
| E | User1 has a license for Microsoft Planner: No
User2 has a license for Microsoft Planner: No
User3 has a license for Microsoft Planner: Yes |
| F | User1 has a license for Microsoft Planner: No
User2 has a license for Microsoft Planner: No
User3 has a license for Microsoft Planner: No |
Correct answer: AExplanation:
A user can be a member of multiple groups with license policies specified. A user can also have some licenses that were directly assigned, outside of any groups. The resulting user state is a combination of all assigned product and service licenses. If a user is assigned the same license from multiple sources, the license is consumed only once.
A service is disabled only if it is disabled in ALL assignments.
References:
What is group-based licensing in Microsoft Entra ID?
Assign licenses to users by group membership using the Microsoft 365 admin center
Assign Microsoft 365 licenses to user accounts
Question: 505
Measured Skill: Implement and manage Microsoft Entra identity and access (25-30%)
Your network contains an on-premises Active Directory Domain Services (AD DS) domain. The domain contains a user named User1.
You have a Microsoft Entra tenant that contains a user named User2.
You plan to use Microsoft Entra Cloud Sync to sync the AD DS domain and the Microsoft Entra tenant.
You need to ensure that User1 can install Microsoft Entra Cloud Sync in the domain, and User2 can configure Microsoft Entra Cloud Sync in the tenant. The solution must follow the principle of least privilege.
To which group should you add User1, and which role should you assign to User2?
(To answer, select the appropriate options in the answer area. NOTE: Each correct selection is worth one point.)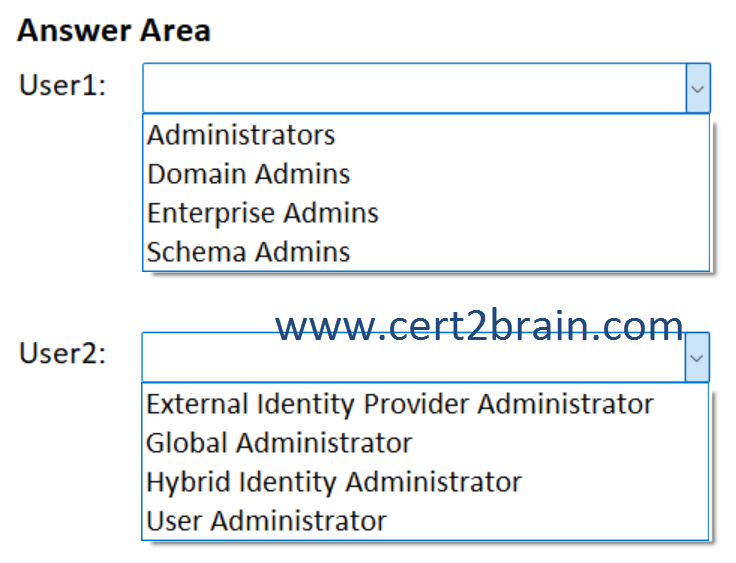
| A | User1: Administrators
User2: Global Administrator |
| B | User1: Administrators
User2: Hybrid Identity Administrator |
| C | User1: Domain Admins
User2: Hybrid Identity Administrator |
| D | User1: Enterprise Admins
User2: Global Administrator |
| E | User1: Enterprise Admins
User2: External Identity Provider Administrator |
| F | User1: Schema Admins
User2: User Administrator |
Correct answer: CExplanation:
With Microsoft Entra Cloud Sync, provisioning from AD to Microsoft Entra ID is orchestrated in Microsoft Online Services. An organization only needs to deploy, in their on-premises or IaaS-hosted environment, a light-weight agent that acts as a bridge between Microsoft Entra ID and AD. The provisioning configuration is stored in Microsoft Entra ID and managed as part of the service.
You need the following to use Microsoft Entra Cloud Sync:
Domain Administrator or Enterprise Administrator credentials to create the Microsoft Entra Connect cloud sync gMSA (group managed service account) to run the agent service.
Note: Microsoft Entra Cloud Sync supports and uses a gMSA for running the agent. You'll be prompted for administrative credentials during setup, in order to create this account.
A Hybrid Identity Administrator account for your Microsoft Entra tenant that isn't a guest user.
Microsoft Entra Cloud Sync agent must be installed on a domain-joined server that runs Windows Server 2022, Windows Server 2019, or Windows Server 2016. We recommend Windows Server 2022. You can deploy Microsoft Entra Cloud Sync on Windows Server 2016, but since it's in extended support, you might need a paid support program if you require support for this configuration. Installing on unsupported versions of Windows Server may cause service failures or unexpected behavior.
This server should be a tier 0 server based on the Active Directory administrative tier model. Installing the agent on a domain controller is supported.
The Active Directory Schema is required to have the attribute msDS-ExternalDirectoryObjectId, which is available in Windows Server 2016 and later.
The Windows Credential Manager service (VaultSvc) cannot be disabled as that prevents the provisioning agent from installing.
High availability refers to the Microsoft Entra Cloud Sync's ability to operate continuously without failure for a long time. By having multiple active agents installed and running, Microsoft Entra Cloud Sync can continue to function even if one agent should fail. Microsoft recommends having 3 active agents installed for high availability.
On-premises firewall configurations.
References:
What is Microsoft Entra Cloud Sync?
Prerequisites for Microsoft Entra Cloud Sync
Install the Microsoft Entra provisioning agent
Question: 506
Measured Skill: Implement and manage Microsoft Entra identity and access (25-30%)
You have a Microsoft 365 E5 subscription that contains a user named User1.
You need to perform the following actions:
- Create a shared mailbox named Mbox1 in the subscription.
- Grant User1 the Send As permission for Mbox1.
Which Microsoft 365 portals can you use to perform each task?
(To answer, select the appropriate options in the answer area. NOTE: Each correct selection is worth one point.)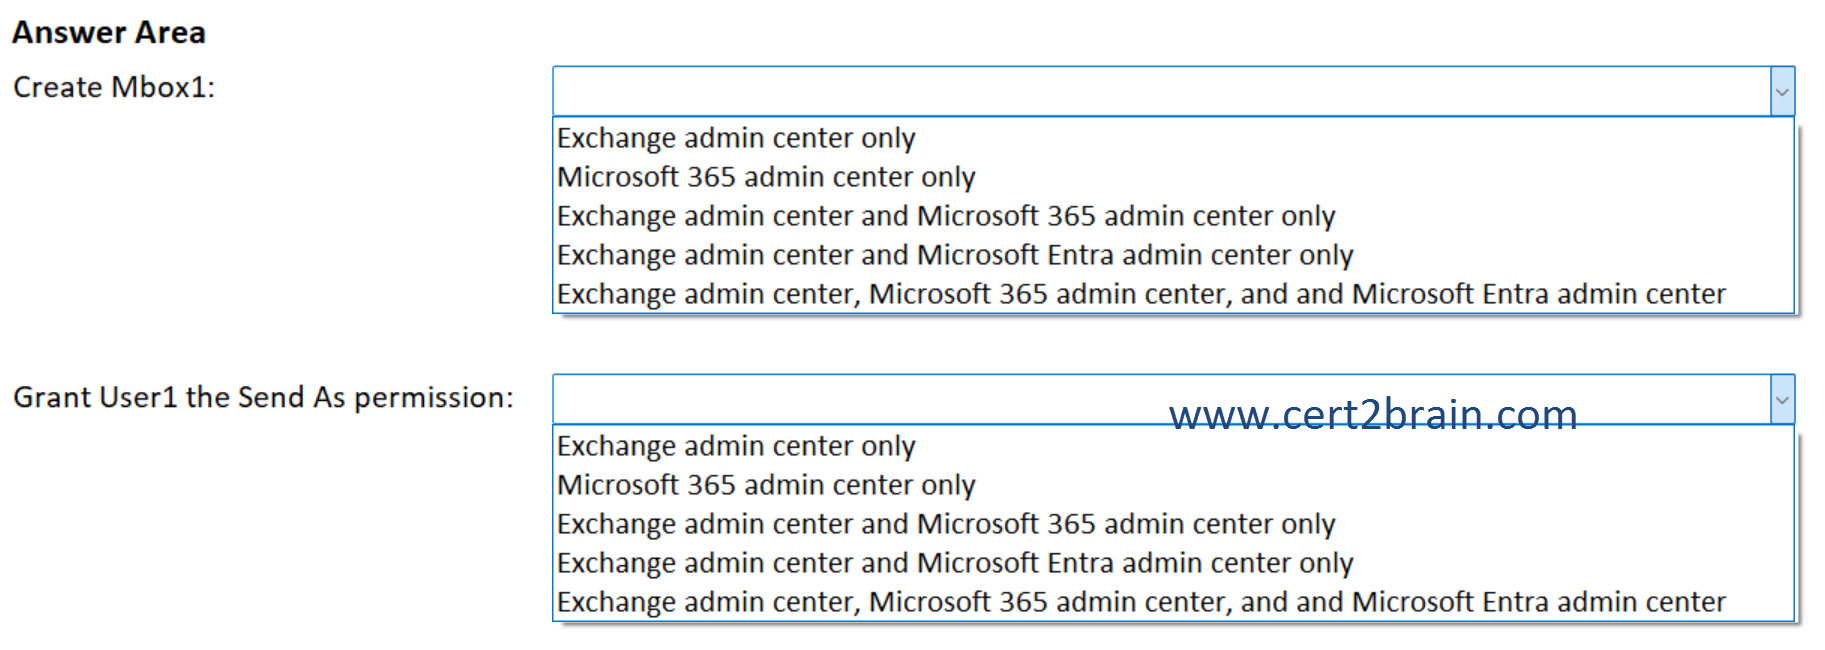
| A | Create Mbox1: Exchange admin center only
Grant User1 the Send As permission: Microsoft 365 admin center only |
| B | Create Mbox1: Microsoft 365 admin center only
Grant User1 the Send As permission: Exchange admin center only |
| C | Create Mbox1: Exchange admin center and Microsoft 365 admin center only
Grant User1 the Send As permission: Exchange admin center and Microsoft 365 admin center only |
| D | Create Mbox1: Exchange admin center and Microsoft Entra admin center only
Grant User1 the Send As permission: Exchange admin center only |
| E | Create Mbox1: Exchange admin center, Microsoft 365 admin center, and and Microsoft Entra admin center
Grant User1 the Send As permission: Exchange admin center and Microsoft Entra admin center only |
| F | Create Mbox1: Exchange admin center, Microsoft 365 admin center, and and Microsoft Entra admin center
Grant User1 the Send As permission: Exchange admin center, Microsoft 365 admin center, and and Microsoft Entra admin center |
Correct answer: CExplanation:
For both tasks, we can use either the Microsoft 365 admin center or the Exchange admin center. Both admin portals allow to create a shared mailbox and to grant User1 the Send As permission for the shared mailbox.
The Entra admin center cannot create mailboxes or manage mailbox permissions.
References:
Create a shared mailbox
Configure Microsoft 365 shared mailbox settings
Give mailbox permissions to another Microsoft 365 user
Allow members to send as or send on behalf of a group
Question: 507
Measured Skill: Manage security and threats by using Microsoft Defender XDR (30–35%)
You have a Microsoft 365 subscription.
You create a Microsoft Defender Threat Intelligence (Defender TI) project named Project1.
You need to add artifacts to Project1.
Which type of artifact can you add to Project1?| A | Microsoft SharePoint Online sites |
| B | Network segments |
| C | IP addresses |
| D | Microsoft Entra users |
Correct answer: CExplanation:
Microsoft Defender Threat Intelligence (Defender TI) lets you develop private personal or team projects to organize indicators of interest and indicators of compromise (IOCs) from an investigation. Projects contain a listing of all associated artifacts and a detailed history that retains the names, descriptions, collaborators, and monitoring profiles.
In a Microsoft Defender Threat Intelligence (Defender TI) project, users can add key infrastructure artifacts, specifically IPs, domains, and hostnames, to organize, analyze, and enrich investigation data. Projects allow for tracking, tagging, and visualizing relationships between these indicators of compromise (IOCs).
When you search an IP address, domain, or host in Intel explorer within the Microsoft Defender portal, and if that indicator is listed within a project you have access to, you can go to the Projects tab and navigate to the details of the project for more context about the indicator before reviewing the other data sets for more information.
Visiting a project's details shows a listing of all associated artifacts and a detailed history that retains all the context described previously. You and other users within your organization no longer need to spend time communicating back and forth. You can build threat actor profiles within Defender TI, which can serve as a "living" set of indicators. As you discover or find new information, you can add it to that project.
References:
What is Microsoft Defender Threat Intelligence (Defender TI)?
Using projects